Sunday, August 28, 2011

Turbo Fire Results: First 28 Days

Haller! 

It's time to track my results for the first 28 days of my new program, Turbo Fire with Chalene Johnson

Prior to this, I was in keto diet for 2 weeks and had 2 weeks of Turbo Fire prep schedule (slightly lighter workout rotation). Then, I proceeded with the proper class schedule. When I started doing cardio with TF, I allowed myself to consume more carbs, up to around 100 grams per day.

So, here are my results for a total of 2 months in low-carb diet, inclusive of 6 weeks of intense cardio workouts daily.

SCALE RESULTS
Starting Weight: 126
Current Weight: 117

Weightloss to Date: 9 lbs

TAPE RESULTS
I measured my arms, chest, waist, hips, abductors, butt, thighs and legs.

Starting Inches Total: 270.5
Current Inches Total: 259.5

Inches Lost to Date: 11 inches
I lost inches most on my waist (2 inches), butt (1.75) and abductors (1.5).

Hooray! I am quite pleased. Sorry there are no before and after photos. :-)
Now, on to the 2nd month of Turbo Fire! Cardio (with weighted hand gloves) and muscle training rotation. Wish me luck!

Thursday, August 25, 2011

Turbo Fire Results Tracking set on Sunday!


I can't believe my last entry was almost 2 weeks ago! Days on the second half of my birthday month (still claiming) flew by so fast with so many trips, tasks and other time-wasting activities! I won't pretend every moment was spent working on worthwhile pursuits, haha! Anyway, I'm holding myself accountable for this blog and posting is a must.

-----

I recently embarked on a new workout program called Turbo Fire.

Turbo Fire is an in-home workout program developed by my favorite trainer, Chalene Johnson and BeachBody. Also under her belt, copies of which I have and used, are Turbo Jam and Chalean Extreme.

Turbo Fire is a high intensity workout that involves plyometrics and cardio bursts called “HIITS” or High Intensity Interval Training. The moves are based on Chalene's Elite 11 (Turbo Jam) but the pace is much faster and the jacks, kicks, jumps and lungers are more intense. With more plyometric training and more interval training, Turbo Fire will focus on lengthier intensity bursts and shorter breaks. This kind of training is similar to the ones used by athletes--so as Chalene always says, "Think of yourself as an athlete!"

There are 18 videos altogether.
  • One (1) video guide on the whole program 
  • Five (5) cardio workouts starting from 30 minutes up to 60 minutes
  • Four (4) HIIT varying in lengths from 15 minutes to 30 minutes
  • Six (6) targeted workouts covering toning, sculpting, abs, core, lower and upper body.
  • Two (2) stretch videos for your recovery
All these workouts are mixed and matched within a 12-week program designed to achieve maximum results. You can extend the program to a total of 20 weeks if you desire. 
The video is filmed in a class setting, with Chalene leading as the trainer on a stage and lots of people on the floor following her command. This includes you, of course. According to Chalene, this arrangement inspires people to do more and workout to their maximum ability. If you're feeling tired, all you do is look to your right or left and match the energy exerted by your neighbor and keep up with them. I must say, it works. But you also have to really picture yourself in the class and feel the energy in order to benefit from this approach.

The very complete package also includes the Fitness Guide (overall manual for the program) 5-Day Inferno Plan (quick weightloss plan), Nutrition Guide, Turbo Tracker (a notebook to track your results) and the Class Schedules including one that mixes Turbo Fire with Chalean Extreme.

Did I say Chalene is my favorite? I follow her on Twitter, Facebook, You Tube etc. When people ask me who I train with or who my trainer is, I immediately say, with all pride and yabang, that my trainer is Chalene Johnson!

Anyway, I think I'm starting to sound like a salesperson for Turbo Fire. But can I help it if I'm really having major major fun with this workout?! Needless to say, I highly recommend it. If you're interested on having your copy, just follow the links I put above.

Now for my 4-week results... that's coming up on Sunday. Wish me luck and more energy for my workouts!


Thursday, August 18, 2011

Beef Salpicao

Hi guys!

I'm really enjoying posting the dishes I cook here. :-)  Hopefully, you are too.
So, here's another recipe I recently tried, my long-time favorite, BEEF SALPICAO!


The original recipe is here. But I tweaked it a little to suit our taste. :-)

BEEF SALPICAO
Serves 2 (in keto)

Ingredients:
  • 1 1/2 lbs beef sirloin (or tenderloin), cubed
  • 3 tablespoons garlic, minced
  • 2 teaspoons salt
  • 2 teaspoon ground black pepper
  • 3 tablespoons olive oil
  • 2 tablespoons soy sauce
  • 5 tablespoons Worchesteshire Sauce
  • 2 tablespoons oyster sauce
  • 1/4 cup button mushrooms, can be sliced if you want them smaller
  • 1/8 cup butter
  • 1 teaspoon garlic bits (for garnish) 

Method:
  1. Marinate beef in salt, pepper and garlic. Take as much time as possible, but 1 hour is enough.
  2. Add the olive oil for the last 30 minutes.
  3. Apply high heat on a pan then put in the combined ingredients once the pan is hot enough.
  4. Sear the beef until the color of the outer part turns brown. Try to toss the beef while searing so that all sides are uniformly cooked.
  5. Add the soy sauce, oyster sauce and Worchesteshire sauce and continue tossing and let the beef absorb the liquid, but be careful not to let it dry up.
  6. Add the mushrooms and toss.
  7. Put in the butter and cook for 2 to 3 minutes more.
  8. Transfer to a serving plate and serve hot.
  9. Sprinkle some garlic bits on top for garnish.

The butter is lovely! It makes the sauce creamy and glossy.
For this recipe, sirloin or tenderloin is a must. There will be no time to tenderize the meat, so you have to pick the really tender parts.

This is great with rice or as a pica-pica for your cocktails. However you want it, always make sure to serve it hot!

Hope you try it!

Our Kitchen

Another furnishing post! 

Here's our humble kitchen where I whip up all the recipes I post here. :-) I love our kitchen, or should I say, MY kitchen. Talagang in-own ko na!

Almost all the things I listed in our wedding gift registry were for kitchen items, and almost all the stuff I shop for now are for the kitchen and for cooking! Yes, you can say I'm a bit obsessed.


Here we have the essential kitchen triangle (gas range, refrigerator and sink), as prescribed by Martha Stewart. The sizes of the counter, ref and range were all exactly measured to fit the space from the start of the construction.

We went to about 8 studies of the color scheme here, some had reds, blues, etc. But my non-negotiable was a white countertop (it just looks yellow because of the light). Eventually, we chose a creamy brown tile backsplash and the light brown cabinets followed.

The 4-burner gas range/oven and hood are my most priced equipment in the house. :-) Bought it December 2010, even if the house was not yet finished at that time. Vincent's workers had to carry it through the stairs all the way to the 6th floor, God bless them!

Notice we don't have a rice cooker out on the counter? Sitting on its place instead are my cute color-coded chopping boards!

Now that you've seen my workspace, back to more recipes. :-)

Sunday, August 14, 2011

Friday, August 12, 2011

Stirfry Black Pepper Beef in Peanut Sauce

Inspired by one of my favorite recipe and craft bloggers, Amanda's Cookin', here's another recipe for you!

The original recipe is here, but I tweaked it a little cause I don't like using too many ingredients (to save on money, of course) and to make sure the dish is OK for Momon's keto diet. I removed the cornstarch, sesame oil, water chestnuts, etc. I also did not use the measurements prescribed, I somehow just eyeballed it, but I still indicated them here so it can be a basis for you too.

Bear in mind that this changes the dish in more ways than one. So, it's up to you to choose however you want to cook your version.


Stirfry Black Pepper Beef in Peanut Sauce
Serves 4

Ingredients:
1 pound flank steak, sliced thin against the grain
Freshly ground black pepper
4 tablespoon soy sauce
3 tablespoons of canola oil
3/4 cup chicken or beef broth
1 tablespoon oyster sauce
2 tablespoons creamy peanut butter
4 cloves minced garlic (about 2 teaspoons)
1/2 pound fresh sugar snap peas

Method:
  1. Place sliced beef in a large bowl. Marinate beef in black pepper (a good 10-12 turns) and soy sauce.
  2. In a separate bowl, mix together chicken broth, oyster sauce and peanut butter. Use a whisk to combine. Set aside.
  3. Heat wok over high heat until hot. Turn heat down to medium high and add 2 tablespoons of the oil. Stir fry the beef until lightly brown, 3-4 minutes. Remove beef and set aside.
  4. Add remaining tablespoon of oil to the skillet, swirl, then add the snap peas. Stir fry for 1-2 minutes then add the garlic.
  5. Add beef back into vegetables in wok and stir. Whisk the peanut sauce then pour into pan and stir. Allow sauce to boil for a minute then reduce heat and simmer until sauce coats the beef and snap peas.

Our friend Hanna was dining with us the night we tried this dish, and she had it with rice! She loved it! (Wait, she loves to eat anything.) For us, it was a little to saucy and heavy on the palette--truly perfect with rice! So for keto purposes, we'll probably have to tweak it a little more to make it lighter. Maybe make the sauce thinner or something.

Anyway, hope you try it yourself so you can tell me about your version. :-) 
Til next recipe!

Chicken Cordon Bleu

This is the keto (low-carb, high fat) version of the dish.
Found this at a southbeach diet site. Here's the original link which will direct you to more great recipes.


CHICKEN CORDON BLEU
Serves 4 (if in keto diet)
Less than 1 gram per serving.

Ingredients:
    •    4 boneless skinless chicken breasts, flattened with a meat mallet, cut into two
    •    8 slices of ham
    •    8 slices of chesse
    •    1 tablespoon melted butter
    •    1 large egg; beaten
    •    3/4 cup parmesan cheese

Method:
    •    Pound chicken breasts to about 1/3" thick.
    •    Place ham on breast then 1 slice cheese. Roll up and secure with toothpicks.
    •    Dip each breast-roll into a mixture of the melted butter and beaten egg.
    •    Roll in parmesan cheese and place in buttered baking dish.
    •    Bake at 350ºF for 30 to 35 minutes or until browned and tender.


Don't forget to get all the melted cheese on the casserole! Yum-o!

Monday, August 08, 2011

Our Living Room

So, as promised here are more furnishing entries!
This is also sort of a review for our furniture provider, Mandaue Foam.

Tada! Here's our living area. Still a work in progress.


We got the couch from Mandaue Foam Furniture Store. The design is from their product catalog, called Savannah, but the size was made to fit the space we have. We wanted an L-shaped couch since the beginning and we're very happy we did.

Fabric Design
Much of your decisions on this aspect will be dictated by the available fabric with Mandaue Foam. Yes, there are a lot and it can be quite confusing to choose, but we you have to be careful and have it marry to your existing color scheme. 

I think it's key to manage your expectations about the fabrics on the onset. We all have that perfect fabric design we've been dreaming of for our space. But you can't have it if it's not on their swatches. You can search elsewhere, yes, like Shell Canvas and other fabric stores. But most of them are too expensive; and Manduae Foam only takes off a P150/meter deduction on your total tab. The other fabrics are usually P1,000/meter. So, obviously it's not a very good option to buy fabric outside--unless you have lots of money!

I got quite frustrated as we were choosing the fabrics. There were some swatches in the catalog that were actually no longer available. Imagine the frustration when after leafing through so many fabrics, getting that triumphant moment, and you find out it's no longer available? Argh. I told them they should fix their catalog to prevent customers from getting frustrated. 

For our couch, we decided to have a two-toned design. We chose a mid-brown color for the base so it's easy to match with other fabrics. Then, the seat and pillows just mirrored each others' colors. 

The fabrics for the seats and pillows are replaceable, of course. We plan to have replacements of these done after a few months. This gives us an opportunity to have a new design element in our home just by simply changing the seat cover colors, design, etc. And not to mention we have to wash the covers too, right?

Delivery
Ordering from Mandaue Foam is easy enough after you get past the slightly frustrating part of choosing your fabrics. Different payment schemes are available too. Now comes the waiting game for the delivery. 

For couches, they promise to deliver 3-4 weeks after your order has been placed. Tip: Give them a call 5 days before your promised delivery date so they are reminded of your order, and you are one of the first on the list for the delivery time on the specific date you agreed on. For us, they delivered on time, no problem.

BUT, they delivered the wrong item.

Saturday, August 06, 2011

Welcome to Momon and Ros'!

Hey guys, just want to share with you our new home!
It's a bi-level condo unit in Quezon City, located near the very active streets of Tomas Morato and Quezon Avenue.

The turnover was a bare unit. The interiors were designed and constructed by our best friend Architect Vincent! The ideas were a consolidated effort between Momon, myself, Vincent, Rhea and Ben. Thank you Mom and Dad for helping us get our own home!

So here are some before and after photos, chronicling the construction from December to February. 
We moved in around mid-April with help from so many friends, so of course, the house doesn't look like this anymore. Watch out for more entries about our evolving home in the coming weeks. More stories on furnishing, decorating and so many other stuff soon! :-)


LIVING AREA


KITCHEN
This is my favorite space!


There is a weird tint to the photo above. It's not supposed to be this color. :-)
Anyway, there was a major debate about the backsplash tiles, which I lost 4-1!

The gas range and the ref were still not in place at this point. But if you can imagine with me, the ref is on the left and the gas range is on the right, just below the range hood.
DINING AREA
So, I guess from this photo you can start to see the position of the spaces relative to each other.


STAIRS
Look! There's our kitchen with much better light!
Vincent also included some mirrors. To make the space feel bigger, as it obviously needs.


BEDROOM AREA
We decided not to close the 2nd floor but open it like a loft.
We painted it light blue, a bit inspired by the interiors of White Hat. The paint meeting was conducted there with some yummy yogurt.


CLOSET
Loving the color scheme here!


SERVICE AREA
This is the space just right outside the bathroom, sort of like an extended bathroom. For other unit owners, maybe this is where they have their washing machine, etc.

Notice my pretty floor tiles?

  
BATHROOM
And here is the bathroom! It's quite difficult to take a photo of the space since it's not so big.
But I love how it feels open with the blue and dark brown tiles.


Needless to say, we love our home! Come by and visit!

Monday, August 01, 2011

Happy 28th!

It's my birthday month! Like always, I claim the whole month of August as my chance to celebrate my birthday. So, what are we waiting for?

SATURDAY DINNER with PADUAS


Padua family came over to Sofia Saturday night.
It's their first time to visit the house after the construction and after we moved in. :-)

SUNDAY LUNCH with HUNNIES


Birthdays would not be complete without a celebration with Compassion 5.
Kaso nga lang tinulugan kami ni Ben! OK lang Koko!
Buti na lang we have a special guest... Cheska!


BIRTHDAY DINNER with MOMON
Momon and I celebrated my birthday at Cerchio Restuarant at Sct. Limbaga, just a few blocks away from our house. It's so convenient to live just a few blocks from Tomas Morato row of restaurants!

For appetizer, we ordered Grilled Shrimp and Pomelo Salad and Singaporean Crispy Squid Heads.

The salad was a little overdressed for my taste, but it was really good.  But the clear winner among all those we ordered was the crispy squid. I NEED to get a recipe of this squid heads!


For the entrees, we had some difficulty choosing because most the dishes are best eaten with rice. The grilled kare-kare was very enticing, but we'd miss rice too much if we ordered it. We also wanted to try the baked crispy pata but it was too much for two. Maybe next time when we come back with friends, we'll have them.

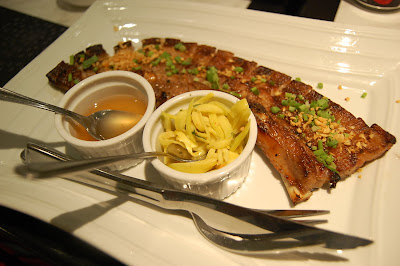
So we decided on Grilled Liempo with Mango Salsa and Pork Sisig. Both were so good, especially the pork sisig. But I realized, it's too much pork!


After dinner, Momon stood up on the premise of checking the dessert bar but came back with these!


Thank you Mymie! Mahaba pa ang birthday month ko!